
 He brought it to the window sill to open it...
  What's inside I wonder?
  A new strawberry-berry hat :-)
 Joy of Joys!! Benny has been so upset since the loss of his hat. It was certainly the most dramatic and painful thing that has happened to him in his 2 and a half years. He has nightmares about it (literally) and the wind- who blew his strawberry hat off- has become his enemy and he is always very concerned about other things (like me) blowing away.
The delight on this little boys face when he saw his new strawberry hat, but that's not all...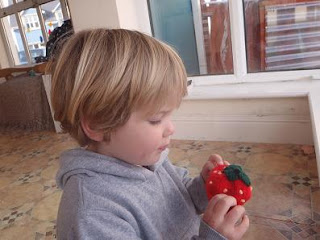 a tiny, tiny one for Lambie too!
 My gorgeous strawberry hatted boy :-)
 It is a very, very old fashioned drapers shop and it is where I have to buy Rebe's school uniform from.
 A boot full of yarn. I'm in knitters heaven.
 a tiny, tiny one for Lambie too!
  My gorgeous strawberry hatted boy :-)
Today was an Endo-something day for me too (apart from the 25 mins I spent 'on hold' this morning trying to get through mountains of red tape grrr!)
This is a shop in our neighbouring village where Rebe goes to school.
 It is a very, very old fashioned drapers shop and it is where I have to buy Rebe's school uniform from.
 Basically, there is a long counter, a few towels and pinnies, socks and table cloths and then the school uniforms out the back. The back room looks as though it was some kind of tailors shop long ago. On a long table there is an old sewing machine with scissors still resting against it. Bobbins with threads on, needles and pin cushins and a sweet old iron are all still there where, whoever it was, left them after their last day's work.
  It is truly like stepping back into the Ireland of old ( I really love it there and the little old lady who runs it - Mrs Harrington- is ever so sweet.)
The back room looks as though it was some kind of tailors shop long ago. On a long table there is an old sewing machine with scissors still resting against it. Bobbins with threads on, needles and pin cushins and a sweet old iron are all still there where, whoever it was, left them after their last day's work. It is truly like stepping back into the Ireland of old ( I really love it there and the little old lady who runs it - Mrs Harrington- is ever so sweet.) While I was there buying Rebe her uniform in the summer, I spotted that in the back of the shop there were shelves and shelves of dusty old bags of wool. 'Oh I didn't know you sold wool' said I. Turns out she doesn't anymore, but still has a little old stock.
Since the summer I have been buying the odd ball of wool from her for small projects like Benny's pirate hat. What I like about her yarn the most is that nearly all of it is 100% wool (my yarn of choice). 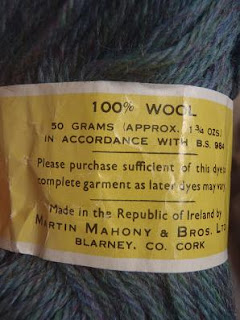 This is because it is vintage yarn and has been lying about her shop for decades, the Blarney Woollen Mill ceased making wool in 1973!
This is because it is vintage yarn and has been lying about her shop for decades, the Blarney Woollen Mill ceased making wool in 1973! Any of you that knit know that 100% wool yarn is difficult to get and is also rather expensive (I would pay about 3.50 euro for a 50g ball of the plainest, simplest wool) and she had shelves of it that she was selling cheap. After a bit of thought and plucking up the courage I made her an offer to take all of her odd balls off her hands for a hundred quid. It has taken her about 3 months to sort through it all, but today finally I went and got it...
 A boot full of yarn. I'm in knitters heaven.
It is mostly odd balls , perects for dolly sweaters and hats. And here and there there is enough for kiddies sweaters or a dress or longies. Here are some of my favourites...


Now I only need to think of a way to sort, organise and store it all?
I would love to share a bit too, would anyone be interested in a vintage Irish wool give away?
Now where are my needles?
I hope you had an endo-something day too x


 There are quite a lot of

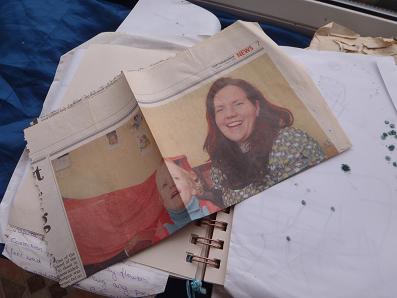
 He did get a bit yellow though ;-) We took lots of pictures of the dinner and we plan to copy some of the script from Rebe's book and then print off her own version of the book to take to her class. I'll share it here when finished. I love doing these sort of projects. They take up a whole day, they really fire our imagination, they are something we all do together and they are so much fun! I also finished this little lady...
 She is a custom order for a
  do you know who is who? Answer given tomorrow x


 I thought you might like to bake along too...

 I found this navy one in a charity shop for 1.50 Euro. It is 100% lambs wool, you do need it to be pure wool or as close to as you can find. Put it into the washing machine on the hottest wash it does with a little of your normal detergent and a towel which helps to
  I laid it onto brown paper and drew the front body shapes, the back and also a sleeve. I then drew around them again giving myself an extra inch. This gives me a seam allowance and also gives


 With right side out place the sleeve as if the arm were folded over the chest. Then open the sleeve to place a pin at the top inside edge securing the top of the sleeve to the top of the shoulder . Sew around the inside of the sleeve,
  I put a hem along the open edges of the front, the neckline and I also hemmed the bottom of the jacket as I had vastly over estimated how much growing room
 There are some good tutorials out there and I find
  I used one of those thread cutter thingies, but a good sharp scissors will also do. Make sure when you cut them that your buttons will fit through, and do it slowly so they don't get too big.
 This is not totally necessary, but it will keep your button holes from ripping and also looks quite cute if you used different colour threads on each hole.

 The
The 


